1. 前言
在微服务架构流行的今天,数据往往分布在不同的服务、不同的数据库中;而实际的业务场景中,存在需要将不同数据聚合在一起做查询的需求。这类功能的开发往往是比较复杂的,可能涉及多种数据源、多种通信协议,且需要实现各类聚合函数,如 count, sum, avg 等。
LightDB 聚合查询就是为了简化聚合查询功能的开发而生的。
1.1. 简述
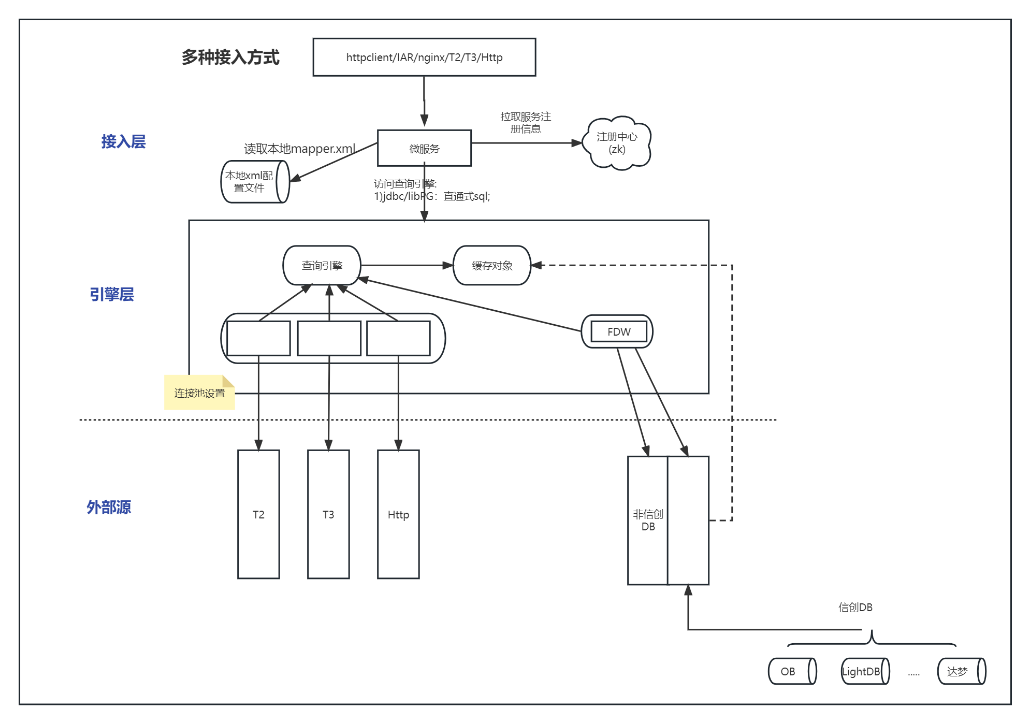
LightDB 聚合查询 主要是实现对来自不同外部服务(HTTP, T2, T3, 其他 DBMS)的数据进行聚合,支持多种数据源数据的联合查询,充分发挥数据库的查询优势,避免在 Java 等应用开发语言中自行实现聚合功能。

LightDB 聚合查询由接入层与引擎层组成,用户在接入层基于 XML 开发聚合查询服务,背后的聚合功能由引擎层实现。
接入层支持 HTTP, T3 协议的接入,可实现微服务的直接对接,也可由 Nginx, IAR 等网关来实现对外服务接口的暴露。
2. 快速开始
本章包含下载、安装、配置、运行、开发聚合服务 五个步骤,用户可遵循本章的步骤快速开始使用 LightDB 聚合查询功能。
2.1. 环境要求
接入层:
需要 Java 1.8 及以上版本
本地试用最低可使用 512MB 内存,正式环境最小使用 2048MB ,建议使用 16GB 内存
引擎层:
Redhat Enterprise Linux 7 系或 8 系系统(包含 CentOS, Rocky Linux),或麒麟系统 V10
磁盘空间在本地试用时最低要求 10GB ,正式使用最少 60GB ,建议 1TB 以上
为了快速试用,可安装一个 CentOS 7 虚拟机。虚拟机相关软件下载地址:
2.2. 下载
下载页面位于 http://www.light-pg.com/downloadCate.html ,需要下载 LightDB-X ,与聚合查询工具。
2.3. 安装
需要安装 SQL 引擎与接入层两部分。
2.3.1. SQL 引擎安装
按照安装手册 http://www.light-pg.com/docs/LightDB_Install_Manual/current/index.html 安装单机版即可。若有高可用需求,也可安装高可用版本。
提示
安装完毕后,建议退出 lightdb 用户再重新登录,确保环境变量已生效
当前版本的聚合查询在装好 SQL 引擎之后,需要开启 http 与 t3 插件。
2.3.1.1. 开启 HTTP 插件
使用 lightdb 用户做如下操作:
# LTHOME 默认路径为 /usr/local/lightdb/lightdb-x/版本号
cd $LTHOME
# 开启插件
ltsql -d postgres
# ltsql 界面,lightdb@postgres=#
create extension http;
结果输出 CREATE EXTENSION 表示创建成功;可在 ltsql 控制台中验证是否开启成功:
select status from http_get('http://www.light-pg.com/');
结果不是提示 ERROR: function http_get(unknown) does not exist 则表示可以正常使用 http 插件。
参考链接:http://www.light-pg.com/docs/lightdb/current/lt_http.html
2.3.1.2. 开启 T3 插件
如果您不需要使用 T3 协议,可跳过此步骤。
若要开启 T3 插件,请参考 LightDB-X 的文档,附录 F 中 t3sdk 的说明进行开启。链接: http://www.light-pg.com/docs/lightdb/current/lt_t3sdk.html
2.3.2. 接入层安装
安装接入层前,请确认安装了:
Java 1.8 及以上版本
ZooKeeper (启动必须)
只需要解压包就好:
# 上传easy-search-xxxxxxxx-debug.ta.gzr到后台
tar zxvf easy-search-xxxxxxxx-debug.tar.gz
chmod +x *.sh
解压后需要做一些必要的配置,见下一节。
要完成接入层的安装,还需要导入初始化 SQL 到 SQL 引擎层,需要等 SQL 引擎启动后才能进行。
2.3.3. SQL 脚本导入
SQL 脚本位于安装包中的 sql 目录中。
如果您是首次安装,直接导入 baseline 中的最新版本即可。
如果您是从老版本升级的,那么需要在 patch 目录中找到您之前执行过的版本号,执行 您已经执行的版本-to-最新版.sql ;如果从您已经执行的版本到最新版之间有多份脚本,如 您已经执行的版本-to-A版.sql A版-to-B版.sql B版-to-最新版.sql,那么这些脚本都是需要执行的。
2.4. 配置
接入层需要做一些配置才能正常使用,配置文件位于 config/application.properties 。
必要的配置如下:
# HTTP端口
server.port=38080
# T3微服务端口
rpc.protocol.port=48080
# 注册中心地址
app.registry.address=127.0.0.1:12181
# 引擎层连接配置
hs.datasource.default.url=jdbc:postgresql://SQL引擎IP:SQL引擎端口/postgres
hs.datasource.default.username=xxxxx
hs.datasource.default.password=xxxxx
以上配置是安装后必须要调整的配置,请按实际情况调整参数。
提示
当然接入层不仅仅包含这些配置,在后续的配置章节还会有详细的配置说明。
2.5. 运行
对于初次安装,运行过程包含以下步骤:
启动 SQL 引擎层
导入初始化脚本
启动接入层
引擎层::
启动命令: lt_ctl start
停止命令: lt_ctl stop
导入初始化脚本:
脚本在聚合查询的安装包中,解压后,使用数据库连接工具连上刚刚启动的引擎层,导入
init.sql即可。
接入层::
启动命令: ./start.sh
停止命令: ./stop.sh
后续就无需再导入初始化脚本了,如果要重启服务,只需要分别启动引擎层与接入层即可。
全部启动完毕后,访问接入层的地址,看看是否可以成功访问:
http://ip:port/gateway/easysearch/getTest
如果没有导入示例数据,会报出 500 错误,错误信息中包含 does not contain value for getTest ,这样就算启动成功。
报错是因为我们没有配置示例数据,在下一节我们可自行开发聚合服务来验证。
2.6. 开发聚合服务
聚合服务的开发过程主要以 MyBatis Mapper + 数据库配置两部分组成,若要用到字典转译功能,可参考 字典转译 章。
参照这篇文章 https://blog.csdn.net/z465759695/article/details/130605936 。
这篇文章中描述了整个聚合服务的开发过程,涵盖了 LightDB 聚合查询的大部分功能,可参照这篇文章来开发自己的聚合服务。
3. HTTP聚合
聚合查询支持SQL语句中直接调用HTTP服务来获取JSON数据集。
3.1. SQL简写支持
想要在Mybatis的SQL文件中使用简写语法${http.服务别名}来远程调用以及自动展开远程调用json结果集为二维表,需要配置服务信息。服务配置表如下:
配置表 es_http_service
url: HTTP服务地址,如:http://ip:port/order/getOrder,支持域名
method: 固定为
postalias: 服务别名,如getExpressInfo,不能包含字符
.-ret_key: 服务返回要抽取的json节点基准路径,如key1.key2 默认为
#表示从根层抽取数据ret_type: ret_key指定的节点数据类型,
jsonObject或者jsonArray;如果数据是[]则是jsonArray,否则就是jsonObject
配置表 es_http_extract
service_alias: 服务别名,同es_http_servie.alias的值
data_name: 字段key名,es_http_service.ret_key基准路径下的key
data_type: 字段类型,data_name对应数据的类型,支持类型
textintegerbigintnumericbooleandatetimetimestampjsonb
用户可以使用LightDB客户端ltsql、dbeaver等工具连接上LightDB后,使用insert
SQL语句进行配置插入。
dbeaver下载连接见http://www.light-pg.com/downloadCate.html
mybatis mapper.xml文件中SQL简写示例如下:
<select id="getExpressInfo" resultType="map">
    select * from ${http.getExpressInfo}
</select>
上述示例中,将调用配置的别名为getExpressInfo的服务并返回json结果。
<select id="getExpressInfo" resultType="map">
    select * from ${http.getExpressInfo} expressInfo
</select>
上述示例中,将调用配置的别名为getExpressInfo的服务并返回json结果,结果展开为二维表后为表取别名expressInfo,可作用于select子句中的字段或者where子句中的字段。
4. T3聚合
聚合查询支持SQL语句中直接调用JRES T3服务来获取JSON数据集。
T3 聚合功能需要在 SQL 引擎层安装一个插件,插件的安装方法请联系恒生电子获取相关资料。
4.1. SQL简写支持
想要在Mybatis的SQL文件中使用简写语法${t3.服务别名.功能号别名}来远程调用以及自动展开远程调用json结果集为二维表,需要配置服务信息。服务配置表如下:
配置表 es_t3_service
service_name: 应用名,JRES微服务的app.name
service_alias: 服务别名,如orderApp,不能包含字符
.-service_group: 应用分组,JRES微服务的app.group
service_version: 应用版本号,JRES微服务的app.version
function_id: JRES微服务中@CloudFunction中的functionId指定的值。
function_alias: 功能号别名,如getOrder,不能包含字符
.-interface_name: JRES微服务中@CloudService所标注的接口的全路径,如:
com.hundsun.demo.order.api.OrderServiceret_key: 服务返回要抽取的json节点基准路径,如key1.key2 默认为
#表示从根层抽取数据ret_type: ret_key指定的节点数据类型,
jsonObject或者jsonArray;如果数据是[]则是jsonArray,否则就是jsonObject
配置表 es_t3_extract
service_alias: 服务别名,同配置表es_t3_service.service_alias的值
function_alias: 功能号别名,同配置表es_t3_service.function_alias的值
data_name: 字段key名,es_t3_service.ret_key基准路径下的key
data_type: 字段类型,data_name对应数据的类型,支持类型
textintegerbigintnumericbooleandatetimetimestampjsonb
用户可以使用LightDB客户端ltsql、dbeaver等工具连接上LightDB后,使用insert
SQL语句进行配置插入。
dbeaver下载连接见http://www.light-pg.com/downloadCate.html
mybatis mapper.xml文件中SQL简写示例如下:
<select id="getOrder" resultType="map">
    select * from ${t3.orderApp.getOrder}
</select>
上述示例中,将调用配置的别名为getExpressInfo的服务并返回json结果。
<select id="getOrder" resultType="map">
    select * from ${t3.orderApp.getOrder} orderInfo
</select>
上述示例中,将调用配置的别名为orderApp、功能号别名为getOrder的服务并返回json结果,结果展开为二维表后为表取别名orderInfo,可作用于select子句中的字段或者where子句中的字段。
5. 外部表聚合
通过LightDB FDW技术,可以像访问本地表一样访问外部表。
5.1. Oracle外部表
oracle_fdw支持像访问本地表一样访问Oracle中的表。
安装Oracle插件,示例如下:
前置条件,需要确保LightDB数据库用户具备Oracle客户端的访问执行权限。下载安装好Oracle客户端后需要配置环境变量,示例如下:
export ORACLE_HOME=/home/lightdb/instantclient_19_10
export LD_LIBRARY_PATH=$ORACLE_HOME:$LD_LIBRARY_PATH
export TNS_ADMIN=/home/lightdb/instantclient_19_10
export NLS_LANG=american_america.utf-8
上述路径为笔者的环境路径,使用者需要根据自身环境情况使用自身的路径。
注意:需确保环境变量生效后启动LightDB,如果已经启动LightDB,可以尝试重启。
安装Oracle FDW插件,语句如下:
create extension oracle_fdw;
配置Oracle,示例如下:
create server oradb foreign data wrapper oracle_fdw options (dbserver '//<地址>:<端口>/<SID>');
create user mapping for <LightDB用户名> server oradb options (user '<Oracle用户名>', password '<Oracle密码>');
GRANT USAGE ON FOREIGN DATA WRAPPER oracle_fdw TO CURRENT_USER;
GRANT USAGE ON FOREIGN SERVER oradb TO CURRENT_USER;
创建外部表,示例如下:
CREATE foreign table express_info (
   express_id VARCHAR(64),
   order_id  VARCHAR(64) ,
   express_no VARCHAR(64),
   company VARCHAR(64) ,
   create_datetime  VARCHAR(14),
   status  VARCHAR(1)
) server oradb OPTIONS (schema '<XXXX>', table '<EXPRESS_INFO>' );
注意:上述示例中schema指定的名字和table指定的名字在ORACLE一般为大写。到这里,可以像访问本地表一样访问Oracle表了。
5.2. MySQL外部表
mysql_fdw支持像访问本地表一样访问mysql中的表。
安装mysql插件,示例如下:
前置条件,需要确保LightDB数据库用户具备MySQL客户端的访问执行权限。下载安装好MySQL客户端后需要配置环境变量,示例如下:
export MYSQL_HOME=/home/root/mysql/mysql
export LD_LIBRARY_PATH=$MYSQL_HOME/lib:$LD_LIBRARY_PATH
上述路径为笔者的环境路径,使用者需要根据自身环境情况使用自身的路径。
注意:需确保环境变量生效后启动LightDB,如果已经启动LightDB,可以尝试重启。
安装MySQL FDW插件,语句如下:
create extension mysql_fdw;
配置MySQL,示例如下:
create server mysqldb foreign data wrapper mysql_fdw options (host '<地址>', port '<端口>');
create user mapping for <LightDB用户名> server mysqldb options (username '<MySQL用户名>', password '<MySQL密码>');
GRANT USAGE ON FOREIGN DATA WRAPPER mysql_fdw TO CURRENT_USER;
GRANT USAGE ON FOREIGN SERVER mysqldb TO CURRENT_USER;
创建外部表,示例如下:
CREATE foreign table express_info (
    express_id VARCHAR(64),
    order_id  VARCHAR(64) ,
    express_no VARCHAR(64),
    company VARCHAR(64) ,
    create_datetime  VARCHAR(14),
    status  VARCHAR(1)
    ) server mysqldb OPTIONS (dbname 'easysearch', table_name 'EXPRESS_INFO' );
到这里,可以像访问本地表一样访问MySQL表了。
6. 聚合API
easy-search有三类API暴露,自省HTTP服务,JRES T3服务以及IAR网关的HTTP服务。
下面示例中 <API服务名> 的取值来源于MyBatis mapper文件的statementId短名字。举个例子:
<select id="getExpressInfo" resultType="map">
    select * from ${http.getExpressInfo}
</select>
上面的SQL代码片断代表聚合服务getExpressInfo。
6.1. 自省HTTP接口
easy-search启动后自身会暴露一组HTTP接口服务用于聚合查询,规则如下:
http://ip:port/gateway/easysearch/<API服务名>
ip为easy-search所在服务地址。port为了easy-search配置文件中server.port指定的端口。
6.2. JRES T3接口
easy-search启动后自身会暴露一组JRES T3接口服务用于聚合查询,规则如下:
接口名规则:mybatis mapper xml文件中的namespace的值
<mapper namespace="com.hundsun.easysearch.TestMapper">
如上interfaceName是 com.hundsun.easysearch.TestMapper
功能号规则: com.hundsun.easysearch.gateway.<API服务名>
6.3. IAR网关API
easy-search启动后自身会暴露一组IAR HTTP接口服务用于聚合查询,规则如下:
http://ip:port/<分组>/<服务名>/<版本号>/<API服务名>
分组是 app.group 指定的值,默认为g;服务名是 app.name 指定的值,默认是easy-search;版本号是 app.version 指定的值,默认是v
7. 字典转译
为方便对聚合查询结果中的字典项进行处理,在聚合查询接入层中,我们设计了专门处理字典项的功能‘字典转译’。
7.1. 功能简介
假设有一个聚合查询功能,它的响应结构如下:
[
   {
      "id": 1,
      "name": "Some Name 1",
      "status": "1",
      "user_category": "1",
      "company_info": {
         "id": 1,
         "company_name": "Some Company",
         "company_type": "C",
         "company_addition_info": {
            "credit_type": "2",
            "credit_level": "A"
         }
      }
   },
   {
      "id": 2,
      "name": "Some Name 2",
      "status": "1",
      "user_category": "2",
      "company_info": {
      }
   }
]
会发现,其中的 status, user_category, company_info.company_type, company_info.company_addition_info.credit_type 字段仅仅是代码而已;若用于前端展示,前端必须要自行处理字典翻译才可以展示比较麻烦。
经过字典转译功能转换后,可得到以下结构:
[
   {
      "id": 1,
      "name": "Some Name 1",
      "status": "1",
      "user_category": "1",
      "status_name": "正常",
      "user_category_name": "企业用户",
      "company_info": {
         "id": 1,
         "company_name": "Some Company",
         "company_type": "C",
         "company_type_name": "集团企业",
         "company_type_desc": "大型集团企业",
         "company_addition_info": {
            "credit_type": "2",
            "credit_level": "A",
            "credit_type_name": "良好"
         }
      }
   },
   {
      "id": 2,
      "name": "Some Name 2",
      "status": "1",
      "user_category": "2",
      "status_name": "正常",
      "user_category_name": "个人用户",
      "company_info": {
      }
   }
]
经过简单的配置,即可在包含字典项的报文中增加字典的翻译。
字典转译支持多级嵌套报文,支持对象列表,满足各种场景下的字典项翻译需求。
7.2. 快速开始
要使用字典转译功能,需要进行两项操作:字典配置、修改 MyBatis Mapper 。
本节会以一套案例的形式介绍字典转译功能,完整案例可下载:example-dict-inject-quickstart.tar.gz
7.2.1. 字典配置
字典配置表是 es_dict_data_source ,它有三个主要字段和两个缓存字段组成。本案例中我们创建名为 getDIQSDemoStatus, getDIQSDemoUserCatetory, getDIQSDemoCompanyType, getDIQSDemoCreditType 的字典数据源,首先将数据源配置放到表中:
INSERT INTO es_dict_data_source (data_source_id,data_source_type,data_source_config,cache_expiry_seconds,max_cache_size)
VALUES
('getDIQSDemoStatus','mybatis','getDIQSDemoStatus', 600, 32)
,('getDIQSDemoUserCatetory','mybatis','getDIQSDemoUserCatetory', 600, 32)
,('getDIQSDemoCompanyType','mybatis','getDIQSDemoCompanyType', 600, 32)
,('getDIQSDemoCreditType','mybatis','getDIQSDemoCreditType', 600, 32)
;
然后将它们的服务进行配置,本案例中使用 http 服务来做演示:
INSERT INTO es_http_service (url, "method", alias, ret_key, ret_type) VALUES
('http://localhost:8935/dict/getStatus', 'POST', 'getDIQSDemoStatus', '#', 'jsonArray');
INSERT INTO es_http_extract (service_alias, data_name, data_type) values
('getDIQSDemoStatus', 'dict_code', 'text')
,('getDIQSDemoStatus', 'dict_name', 'text')
;

INSERT INTO es_http_service (url, "method", alias, ret_key, ret_type) VALUES
('http://localhost:8935/dict/getUserCatetory', 'POST', 'getDIQSDemoUserCatetory', '#', 'jsonArray');
INSERT INTO es_http_extract (service_alias, data_name, data_type) values
('getDIQSDemoUserCatetory', 'user_category', 'text')
,('getDIQSDemoUserCatetory', 'user_category_name', 'text')
;

INSERT INTO es_http_service (url, "method", alias, ret_key, ret_type) VALUES
('http://localhost:8935/dict/getCompanyType', 'POST', 'getDIQSDemoCompanyType', '#', 'jsonArray');
INSERT INTO es_http_extract (service_alias, data_name, data_type) values
('getDIQSDemoCompanyType', 'company_type', 'text')
,('getDIQSDemoCompanyType', 'dict_name', 'text')
,('getDIQSDemoCompanyType', 'dict_desc', 'text')
;

INSERT INTO es_http_service (url, "method", alias, ret_key, ret_type) VALUES
('http://localhost:8935/dict/getCreditType', 'POST', 'getDIQSDemoCreditType', '#', 'jsonArray');
INSERT INTO es_http_extract (service_alias, data_name, data_type) values
('getDIQSDemoCreditType', 'credit_type', 'text')
,('getDIQSDemoCreditType', 'credit_level', 'text')
,('getDIQSDemoCreditType', 'credit_type_name', 'text')
;
然后需要在 MyBatis Mapper 中写 id 为 getDIQSDemoStatus, getDIQSDemoUserCatetory, getDIQSDemoCompanyType, getDIQSDemoCreditType 的查询,它可以使用任何聚合方式,包括 HTTP、T3、外部表、本地表等;本示例采用 HTTP 聚合的方式为例,新增一个 DataSourceMapper.xml ,置于可以被扫描到的路径,写以下内容:
<?xml version="1.0" encoding="UTF-8"?>
<!DOCTYPE mapper PUBLIC "-//mybatis.org//DTD Mapper 3.0//EN" "http://mybatis.org/dtd/mybatis-3-mapper.dtd">
<mapper namespace="com.hundsun.easysearch.DataSourceMapper">

   <select id="getDIQSDemoStatus" resultType="map">
      select dict_name from ${http.getDIQSDemoStatus}
   </select>
   <select id="getDIQSDemoUserCatetory" resultType="map">
      select user_category_name from ${http.getDIQSDemoUserCatetory}
   </select>
   <select id="getDIQSDemoCompanyType" resultType="map">
      select dict_name, dict_desc from ${http.getDIQSDemoCompanyType}
   </select>
   <select id="getDIQSDemoCreditType" resultType="map">
      select credit_type_name from ${http.getDIQSDemoCreditType}
   </select>
</mapper>
这几个接口按前面将的 HTTP 聚合 的方式进行配置,只要能够返回这里 select 的字段即可;这样字典配置就已经完毕。
注意
我们会发现例子中 getDIQSDemoCompanyType 的 select 有两个字段,要注意用于字典的 SQL 中,一个字段与多个字段的处理方式是不同的!
详情请看下一节 字典开发说明 。
且 getDIQSDemoCompanyType 查询的字段为 dict_name, dict_desc ,而我们报文中需要的是 company_type_name, company_type_desc
,它们是不同的;后面提到 /* dict_inject */ hint 时会讲到如何处理这种不同,请读者稍加注意。
说明
新增一份 DataSourceMapper.xml 不是必须的,仅仅是为了维护方便,推荐用户采用独立的方式维护用于数据字典的 Mapper 。
7.2.2. 修改 MyBatis Mapper
假设我们有一份现有的 Mapper :
<?xml version="1.0" encoding="UTF-8"?>
<!DOCTYPE mapper PUBLIC "-//mybatis.org//DTD Mapper 3.0//EN" "http://mybatis.org/dtd/mybatis-3-mapper.dtd">
<mapper namespace="com.hundsun.easysearch.DIQSDemoMapper">
   <select id="getDIQSDemoList" resultType="map">
      select * from ${http.getDIQSDemoList}
   </select>
</mapper>
它返回的数据结构类似于:
[
   {
      "id": 1,
      "name": "Some Name 1",
      "status": "1",
      "user_category": "1",
      "company_info": {
         "id": 1,
         "company_name": "Some Company",
         "company_type": "C",
         "company_addition_info": {
            "credit_type": "2",
            "credit_level": "A"
         }
      }
   },
   {
      "id": 2,
      "name": "Some Name 2",
      "status": "1",
      "user_category": "2",
      "company_info": {
      }
   }
]
那么利用字典转译功能,我们可以做到 status, user_category, company_info.company_type, company_info.company_addition_info.credit_type 几个字段的转译并填充,对当前的 Mapper 做如下修改即可实现:
<?xml version="1.0" encoding="UTF-8"?>
<!DOCTYPE mapper PUBLIC "-//mybatis.org//DTD Mapper 3.0//EN" "http://mybatis.org/dtd/mybatis-3-mapper.dtd">
<mapper namespace="com.hundsun.easysearch.DIQSDemoMapper">
   <select id="getDIQSDemoList" resultType="map">
      /* dict_inject('getDIQSDemoStatus', '', 'status:dict_code', 'status_name') */
      /* dict_inject('getDIQSDemoUserCatetory', '', 'user_category:user_category', 'user_category_name') */
      /* dict_inject('getDIQSDemoCompanyType', 'company_info', 'company_type:company_type', 'company_type_name', 'dict_name') */
      /* dict_inject('getDIQSDemoCompanyType', 'company_info', 'company_type:company_type', 'company_type_desc', 'dict_desc') */
      /* dict_inject('getDIQSDemoCreditType', 'company_info.company_addition_info', 'credit_type:credit_type,credit_level:credit_level', 'credit_type_name') */
      select * from ${http.getDIQSDemoList}
   </select>
</mapper>
字典转译功能采用特殊的注释来实现功能,这几行注释的含义分别为:
数据源 id 为
getDIQSDemoStatus;对象位于第一层;查询参数采用status字段的数值,送出去的查询条件字段为dict_code;取回结果后命名为status_name,数据源 id 为
getDIQSDemoUserCatetory;对象位于第一层;查询参数采用user_category字段的数值,送出去的查询条件字段为dict_code;取回结果后命名为user_category_name,数据源 id 为
getDIQSDemoCompanyType;对象位于company_info下;查询参数采用company_info下的company_type字段的数值,送出去的查询条件字段为company_type;拿到字典数据后取dict_name字段作为结果;取回结果后命名为company_type_name,塞回到对应的company_info下,数据源 id 为
getDIQSDemoCompanyType;对象位于company_info下;查询参数采用company_info下的company_type字段的数值,送出去的查询条件字段为company_type;拿到字典数据后取dict_desc字段作为结果;取回结果后命名为company_type_desc,塞回到对应的company_info下,数据源 id 为
getDIQSDemoCreditType;对象位于company_info.company_addition_info;查询参数采用credit_type与credit_level字段的数值,并以credit_type与credit_level两个条件作为查询条件去查字典 ;取回结果后命名为credit_type_name,
说明
getDIQSDemoCompanyType 的例子比较特殊,是同一个数据源包含了多项数据,是根据 company_type 要查询 dict_name 与 dict_desc 两个字段,将两个字段作为转译结果都放到我们的报文中。
getDIQSDemoCreditType 是一个多层嵌套的,且根据两个条件查询一个字典项的例子,查询时会向 ${http.getDIQSDemoCreditType} 的服务发送 {\"credit_type\": \"2\", \"credit_level\": \"A\"} 这样的请求,然后拿到一个唯一结果作为 credit_type_name 放回到报文中。
虽然本案例中, company_addition_info 是一个对象,但如果它是一个列表,如 "company_addition_info": [{}, {}] 这样的结构时,字典转译功能也是支持的, dict_inject 也是一样的写法。
至此一个完整可用的字典转译功能就可以用了,输出结果会类似于:
[
   {
      "id": 1,
      "name": "Some Name 1",
      "status": "1",
      "user_category": "1",
      "status_name": "正常",
      "user_category_name": "企业用户",
      "company_info": {
         "id": 1,
         "company_name": "Some Company",
         "company_type": "C",
         "company_type_name": "集团企业",
         "company_type_desc": "大型集团企业",
         "company_addition_info": {
            "credit_type": "2",
            "credit_level": "A",
            "credit_type_name": "良好"
         }
      }
   },
   {
      "id": 2,
      "name": "Some Name 2",
      "status": "1",
      "user_category": "2",
      "status_name": "正常",
      "user_category_name": "个人用户"
   }
]
7.3. 字典开发说明
如果字典 sql 的 select 后面 只跟随一个字段 ,则使用该字典的方法无需关注字典的字段名称;而 select 中 含有多个字段 时,
dict_inject 的第四个参数需要与字典 sql 中的字段名称对应;若无法对应,需要在 dict_inject 后面增加第五个参数,描述在数据源中取哪个字段作为字典项。
如以下这个用于字典的 SQL:
<select id="getDIQSDemoStatus" resultType="map">
   select dict_name from ${http.getDIQSDemoStatus}
</select>
它只有一个参数,所以 dict_inject 可以用四个参数的形式:
/* dict_inject('getDIQSDemoStatus', '', 'status:dict_code', 'status_name') */
select * from ${http.getDIQSDemoList}
这样虽然字典返回的是 dict_name ,dict_inject 中写的是 status_name ,也是可以获取的。因为 只返回一个字段 的字典不关注字段名。
但当字典不仅仅有一个 select 字段时,第四个参数的名字就必须出现在字典的 select 列表中!
比如以下情况是无法成功获取的:
<!-- 字典查询方法 -->
<select id="getDIQSDemoStatus" resultType="map">
   select dict_name, dict_desc from ${http.getDIQSDemoStatus}
</select>

<!-- 转译功能 -->
/* dict_inject('getDIQSDemoStatus', '', 'status:dict_code', 'status_name') */
select * from ${http.getDIQSDemoList}
因为 status_name 不在 dict_name, dict_desc 中,无法成功转译。解决办法是增加第五个参数。改造后如下:
<!-- 字典查询方法 -->
<select id="getDIQSDemoStatus" resultType="map">
   select dict_name, dict_desc from ${http.getDIQSDemoStatus}
</select>

<!-- 转译功能 -->
/* dict_inject('getDIQSDemoStatus', '', 'status:dict_code', 'status_name', 'dict_name') */
select * from ${http.getDIQSDemoList}
这样就可以正常转译了,会从字典结果中拿到 dict_name 的值,放到结果集中的 status_name。
7.4. 配置说明
字典转译功能的配置包括数据源配置与 Mapper 特殊注释配置。
7.4.1. 数据源配置说明
数据源表是 es_dict_data_source 结构如下:
列 |
数据格式 |
说明 |
|---|---|---|
data_source_id |
varchar(32) |
数据源 id |
data_source_type
|
varchar(16)
|
数据源类型:
- mybatis: 采用编写 MyBatis Mapper 的方式作为数据源
|
data_source_config
|
varchar(255)
|
数据源配置,每种类型有不同的配置方式:
- mybatis: 配置 statementId 即可
|
cache_expiry_seconds |
integer |
缓存过期时长,秒为单位,小于等于0视为不开启缓存 |
max_cache_size |
integer |
最大缓存个数,小于等于0视为不开启缓存 |
目前仅支持 mybatis 类型的数据源,它已可以满足大多数字典转译需求。
应用参数配置说明请参考 字典转译参数 。
7.4.2. dict_inject 配置说明
当前采用特殊注释的方式,将查询功能与数据源关联起来。
注释形如:
<?xml version="1.0" encoding="UTF-8"?>
<!DOCTYPE mapper PUBLIC "-//mybatis.org//DTD Mapper 3.0//EN" "http://mybatis.org/dtd/mybatis-3-mapper.dtd">
<mapper namespace="com.hundsun.easysearch.TestMapper">
   <select id="getDoubleList" resultType="map">
      /* dict_inject('getDIQSDemoStatus', '', 'status:dict_code', 'status_name') */
      /* dict_inject('getDIQSDemoUserCatetory', '', 'user_category:user_category', 'user_category_name') */
      /* dict_inject('getDIQSDemoCompanyType', 'company_info', 'company_type:company_type', 'company_type_name', 'dict_name') */
      /* dict_inject('getDIQSDemoCompanyType', 'company_info', 'company_type:company_type', 'company_type_desc', 'dict_desc') */
      /* dict_inject('getDIQSDemoCreditType', 'company_info.company_addition_info', 'credit_type:credit_type,credit_level:credit_level', 'credit_type_name') */         select * from ${http.getDoubleList}
   </select>
</mapper>
以上五处注释就是查询功能与数据源关联的配置。这个注释有以下规则:
必须写在开头部分,一旦出现非注释的内容,则不再解析其他注释
注释必须是
/*开头与*/结尾,星号不能多‘函数名’ 固定为
dict_inject参数必须为 4 个或 5 个
参数必须由单引号包装
一个注释块中只能写一个
dict_inject函数注释成功解析为字典转译关联关系后,将不会上送给 SQL 引擎
每个参数的含义如下:
参数 |
含义 |
说明 |
|---|---|---|
1 |
数据字典编号 |
与 |
2 |
对象路径 |
指定哪一层对象需要进行转换。如例子中的 |
3
|
请求参数
|
代表如何访问数据源,配置格式为
source_field:target_field[,source_field:target_field ...];source_field 代表查询结果对象中的字段名; target_field如果要根据多个要素才能拿到一个字典,可以配置多个条件。
|
4 |
转译名称 |
经过字典转译后的结果的字段名,如 |
5 |
字典查询字段 |
从字典数据源中取哪一个字段作为字典值,仅对返回多个字段的字典有效,非必填 |
7.5. 字典转译机制说明
字典转译功能是围绕响应的 Json 报文的功能,它会从 Json 报文中提取待查询的字典,再通过字典数据源获取转译后的说明,并注入到 Json 报文。
7.5.1. 整体机制说明
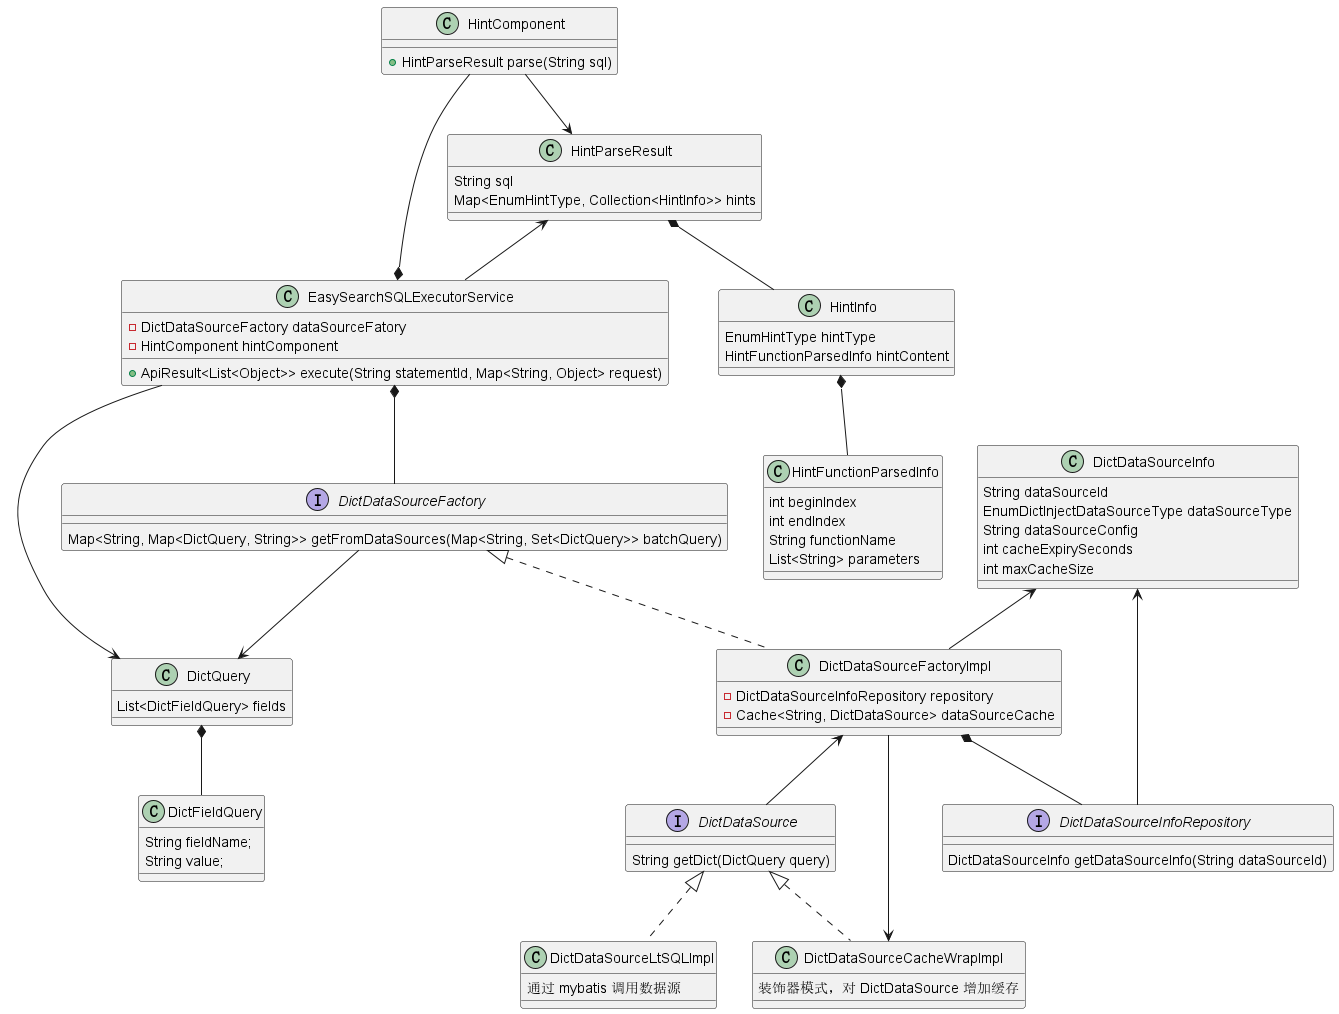
核心类图如下:

核心类说明如下:
类名 |
说明 |
|---|---|
EasySearchSQLExecutorService |
聚合查询执行器,包含 MyBatis 插件、Json 处理等功能,不再展开说明 |
DictDataSourceFactory |
字典翻译工厂,根据数据源 id 与查询请求,调用真正的数据源获取字典数据 |
HintComponent |
Hint 解析组件,解析 SQL 中注释里面的 |
EasySearchSQLExecutorService 是聚合查询功能的核心类,它内部还包含了 MyBatis 组件、Json 处理等功能,在本节不展开说明;字典转译机制是 EasySearchSQLExecutorService 中依赖的一项功能,主要由 HintComponent 与 DictDataSourceFactory 来实现。
EasySearchSQLExecutorService 在执行 SQL 之前,先使用 HintComponent 解析 Hint 函数,获取一系列函数名 + 参数的组合 HintFunctionParsedInfo,从中得知数据源的请求方法;再根据 hint 中得到的数据源请求方法到 DictDataSourceFactory 中进行批量字典查询;拿到字典查询结果后将结果注入到 SQL 响应的 Json 报文中,完成字典转译功能。
可发现 DictDataSourceFactory 提供了批量接口,因为在 EasySearchSQLExecutorService 中做了字典请求的同类项合并,比如 10 个对象中都含有 status: 1 ,那么只会请求数据字典一次。
7.5.2. 缓存机制说明
字典转译功能中有两处缓存:
字典数据源信息缓存,用于存储数据源配置信息
字典查询缓存,用于存储数据源的响应结果
字典数据源信息缓存是缓存的 es_dict_data_source 表,它每隔 easysearch.dict-inject.data-source.refresh-millis 时间后进行全量刷新(默认 30s),是 DictDataSourceInfoRepository 接口的实现类进行的缓存。
字典查询缓存是对远程的字典数据进行缓存的,它通过 es_dict_data_source 表的 max_cache_size 与 cache_expiry_seconds 两项配置决定如何刷新,是 DictDataSourceFactoryImpl 中实现的机制。
8. 附录
附录中包含一些配置说明等。
8.1. 接入层 application.properties 配置说明
这些配置位于 接入层安装目录/config/application.properties ,控制接入层应用的表现。
8.1.1. 通用参数
绝大多数 Jres 微服务都包含的参数。
参数 |
默认值 |
说明 |
|---|---|---|
server.port |
8080 |
接入层 HTTP 协议端口号 |
rpc.protocol.port |
18080 |
接入层 T3 协议端口号 |
app.name |
easy-search |
T3 协议应用名 |
app.group |
g |
T3 协议分组名 |
app.version |
v |
T3 协议版本号 |
app.registry.address |
ZooKeeper 地址,必须配置,格式如 127.0.0.1:2181 |
|
hs.datasource.default.driver-class-name |
org.postgresql.Driver |
数据源驱动名,不要更换 |
hs.datasource.default.url |
数据源,指向 SQL 引擎层,如 jdbc:postgresql://127.0.0.1:5432/postgres |
|
hs.datasource.default.username |
数据源用户名,如 lightdb |
|
hs.datasource.default.password |
数据源密码 |
|
hs.datasource.default.validationQuery |
select 1 |
数据源校验语句,不要更换 |
server.tomcat.max-threads |
200 |
Tomcat 最大工作线程 |
server.tomcat.max-connections |
8192 |
Tomcat 最大连接数。若客户端连接数超过此值,会进行排队 |
server.tomcat.accept-count |
100 |
Tomcat 连接请求排队长度。若排队数超过此值,会拒绝连接 |
server.tomcat.min-spare-threads |
10 |
Tomcat 最小工作线程数 |
其余参数一般不需要调整,若要调整可参照以下链接:
Jrescloud 官方文档:https://iknow.hs.net/portal/docView/home/12795
Spring Boot 官方文档: https://docs.spring.io/spring-boot/docs/2.2.13.RELEASE/reference/html/appendix-application-properties.html
mybatis-spring-boot-starter 官方文档: https://mybatis.org/spring-boot-starter/mybatis-spring-boot-autoconfigure/#configuration
druid-spring-boot-starter 官方文档: https://github.com/alibaba/druid/tree/1.2.8/druid-spring-boot-starter#%E9%85%8D%E7%BD%AE%E5%B1%9E%E6%80%A7
8.1.2. 聚合查询特殊参数
参数 |
默认值 |
说明 |
|---|---|---|
easysearch.datasource-type
|
public
|
可取值 public 与 standalone。
-
public: 使用 Spring 数据源,即 hs.datasource.default 配置的数据源-
standalone: 使用独立数据源,会使用 easysearch.datasource 开头的配置创建数据源;反过来说,若不使用 standalone ,则所有
easysearch.datasource 开头的配置全部无效 |
easysearch.datasource.driver-class-name |
org.postgresql.Driver |
数据源驱动名,不要更换 |
easysearch.datasource.url |
数据源,指向 SQL 引擎层,如 jdbc:postgresql://127.0.0.1:5432/postgres |
|
easysearch.datasource.username |
数据源用户名,如 lightdb |
|
easysearch.datasource.password |
数据源密码 |
|
easysearch.datasource.validationQuery |
select 1 |
数据源校验语句,不要更换 |
easysearch.mapper-locations |
聚合查询使用的 Mapper 所在路径,注意一定要配置通配符,如 file:./mapper/*.xml |
8.1.3. 字典转译参数
参数 |
默认值 |
说明 |
|---|---|---|
easysearch.dict-inject.data-source.refresh-millis |
30000 |
数据源信息 |
easysearch.dict-inject.data-source.pool.max-pool-size |
16 |
并行查询数据源时的线程池最大大小 |
easysearch.dict-inject.data-source.pool.core-pool-size |
8 |
并行查询数据源时的线程池核心大小 |
easysearch.dict-inject.data-source.pool.queue-capacity |
8192 |
并行查询数据源时的线程池队列大小,一般不建议调整 |
easysearch.dict-inject.data-source.pool.keep-alive-seconds |
300 |
并行查询数据源时的线程池关闭延迟,单位为秒,一般不建议调整 |
8.2. 文档附件
9. 发布记录
- LightDB1.0-easy-search-V2023-00-000 (2023-06-28):
发布首个正式版
优化启动过程,当数据库中存在不合法数据时,会打印警告,而不是报错
优化 start.sh 启动脚本,会在一分钟内检测启动状态
优化 stop.sh 的提示文字
- 13.8-23.1-generic-12014-beta (2023-06-02):
字典转译时不再假定查询条件字段必须存在
接入端允许传入空参数
后台接口返回全部为 null 的 json object 时,不再处理成一个 null
数据源机制改造(参考 字典开发说明):
不再限制作为数据源的 statement sql 在 select 中只能写一个查询字段,现在可以写多个,但需要与 dict_inject hint 对应
dict_inject hint 支持第五个参数,作为从字典拿数据所使用的 key
调整了默认配置,用户不再需要配置两份数据源
- 13.8-23.1-generic-11595-beta (2023-05-25):